Command Line Interface
New in version 0.11.
One of the nice new features in Flask 0.11 is the built-in integration of the click command line interface. This enables a wide range of new features for the Flask ecosystem and your own applications.
Basic Usage
After installation of Flask you will now find a flask script
installed into your virtualenv. If you don’t want to install Flask or you
have a special use-case you can also use python -m flask to accomplish
exactly the same.
The way this script works is by providing access to all the commands on
your Flask application’s Flask.cli instance as well as some
built-in commands that are always there. Flask extensions can also
register more commands there if they desire so.
For the flask script to work, an application needs to be discovered.
Flask looks for a module named wsgi.py or app.py by default,
and if it finds one it assumes the application is defined in it.
You can instruct Flask to look for the application in a different module by
exporting the FLASK_APP environment variable. It can be either set to an
import path or to a filename of a Python module that contains a Flask
application.
In that imported file the name of the app needs to be called app or
optionally be specified after a colon. For instance
mymodule:application would tell it to use the application object in
the mymodule.py file.
Given a hello.py file with the application in it named app
this is how it can be run.
Environment variables (On Windows use set instead of export):
export FLASK_APP=hello
flask run
Or with a filename:
export FLASK_APP=/path/to/hello.py
flask run
Virtualenv Integration
If you are constantly working with a virtualenv you can also put the
export FLASK_APP into your activate script by adding it to the
bottom of the file. That way every time you activate your virtualenv you
automatically also activate the correct application name.
Edit the activate script for the shell you use. For example:
Unix Bash: venv/bin/activate:
FLASK_APP=hello
export FLASK_APP
Windows CMD.exe: venv\Scripts\activate.bat:
set "FLASK_APP=hello"
:END
Debug Flag
The flask script can also be instructed to enable the debug
mode of the application automatically by exporting FLASK_DEBUG. If
set to 1 debug is enabled or 0 disables it:
export FLASK_DEBUG=1
Running a Shell
To run an interactive Python shell you can use the shell command:
flask shell
This will start up an interactive Python shell, setup the correct
application context and setup the local variables in the shell. This is
done by invoking the Flask.make_shell_context() method of the
application. By default you have access to your app and g.
Custom Commands
If you want to add more commands to the shell script you can do this easily. For instance if you want a shell command to initialize the database you can do this:
import click
from flask import Flask

app = Flask(__name__)

@app.cli.command()
def initdb():
    """Initialize the database."""
    click.echo('Init the db')
The command will then show up on the command line:
$ flask initdb
Init the db
Application Context
Most commands operate on the application so it makes a lot of sense if
they have the application context setup. Because of this, if you register
a callback on app.cli with the command() the
callback will automatically be wrapped through cli.with_appcontext()
which informs the cli system to ensure that an application context is set
up. This behavior is not available if a command is added later with
add_command() or through other means.
It can also be disabled by passing with_appcontext=False to the
decorator:
@app.cli.command(with_appcontext=False)
def example():
    pass
Loading Environment Variables From .env Files
If python-dotenv is installed, running the flask command will set
environment variables defined in the files .env and .flaskenv.
This can be used to avoid having to set FLASK_APP manually every time you
open a new terminal, and to set configuration using environment variables
similar to how some deployment services work.
Variables set on the command line are used over those set in .env,
which are used over those set in .flaskenv. .flaskenv should be
used for public variables, such as FLASK_APP, while .env should not
be committed to your repository so that it can set private variables.
Directories are scanned upwards from the directory you call flask from to locate the files. The current working directory will be set to the location of the file, with the assumption that that is the top level project directory.
The files are only loaded by the flask command or calling
run(). If you would like to load these files when running in
production, you should call load_dotenv() manually.
Factory Functions
In case you are using factory functions to create your application (see Application Factories) you will discover that the flask command cannot work with them directly. Flask won’t be able to figure out how to instantiate your application properly by itself. Because of this reason the recommendation is to create a separate file that instantiates applications. This is not the only way to make this work. Another is the Custom Scripts support.
For instance if you have a factory function that creates an application from a filename you could make a separate file that creates such an application from an environment variable.
This could be a file named autoapp.py with these contents:
import os
from yourapplication import create_app
app = create_app(os.environ['YOURAPPLICATION_CONFIG'])
Once this has happened you can make the flask command automatically pick it up:
export YOURAPPLICATION_CONFIG=/path/to/config.cfg
export FLASK_APP=/path/to/autoapp.py
From this point onwards flask will find your application.
Custom Scripts
While the most common way is to use the flask command, you can
also make your own “driver scripts”. Since Flask uses click for the
scripts there is no reason you cannot hook these scripts into any click
application. There is one big caveat and that is, that commands
registered to Flask.cli will expect to be (indirectly at least)
launched from a flask.cli.FlaskGroup click group. This is
necessary so that the commands know which Flask application they have to
work with.
To understand why you might want custom scripts you need to understand how click finds and executes the Flask application. If you use the flask script you specify the application to work with on the command line or environment variable as an import name. This is simple but it has some limitations. Primarily it does not work with application factory functions (see Application Factories).
With a custom script you don’t have this problem as you can fully customize how the application will be created. This is very useful if you write reusable applications that you want to ship to users and they should be presented with a custom management script.
To explain all of this, here is an example manage.py script that
manages a hypothetical wiki application. We will go through the details
afterwards:
import os
import click
from flask.cli import FlaskGroup

def create_wiki_app(info):
    from yourwiki import create_app
    return create_app(
        config=os.environ.get('WIKI_CONFIG', 'wikiconfig.py'))

@click.group(cls=FlaskGroup, create_app=create_wiki_app)
def cli():
    """This is a management script for the wiki application."""

if __name__ == '__main__':
    cli()
That’s a lot of code for not much, so let’s go through all parts step by step.
First we import the
clicklibrary as well as the click extensions from theflask.clipackage. Primarily we are here interested in theFlaskGroupclick group.The next thing we do is defining a function that is invoked with the script info object (
ScriptInfo) from Flask and its purpose is to fully import and create the application. This can either directly import an application object or create it (see Application Factories). In this case we load the config from an environment variable.Next step is to create a
FlaskGroup. In this case we just make an empty function with a help doc string that just does nothing and then pass thecreate_wiki_appfunction as a factory function.Whenever click now needs to operate on a Flask application it will call that function with the script info and ask for it to be created.
All is rounded up by invoking the script.
CLI Plugins
Flask extensions can always patch the Flask.cli instance with more
commands if they want. However there is a second way to add CLI plugins
to Flask which is through setuptools. If you make a Python package that
should export a Flask command line plugin you can ship a setup.py file
that declares an entrypoint that points to a click command:
Example setup.py:
from setuptools import setup

setup(
    name='flask-my-extension',
    ...
    entry_points='''
        [flask.commands]
        my-command=mypackage.commands:cli
    ''',
)
Inside mypackage/commands.py you can then export a Click object:
import click

@click.command()
def cli():
    """This is an example command."""
Once that package is installed in the same virtualenv as Flask itself you
can run flask my-command to invoke your command. This is useful to
provide extra functionality that Flask itself cannot ship.
PyCharm Integration
The new Flask CLI features aren’t yet fully integrated into the PyCharm IDE, so we have to do a few tweaks to get them working smoothly.
In your PyCharm application, with your project open, click on Run from the menu bar and go to Edit Configurations. You’ll be greeted by a screen similar to this:
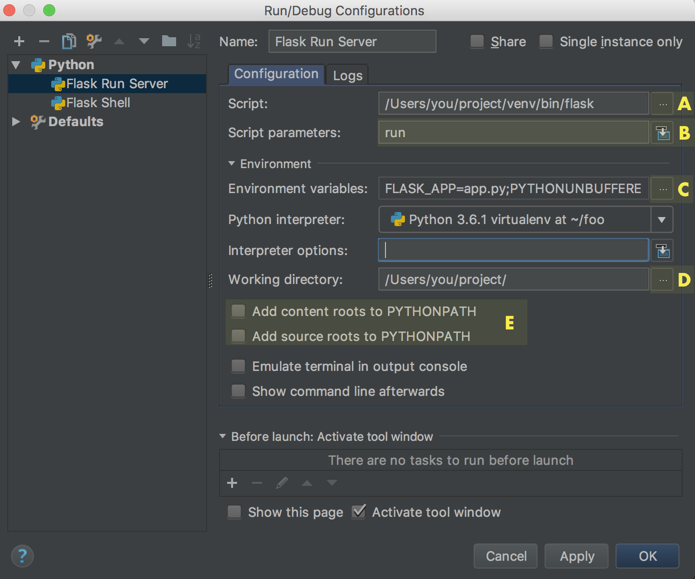
There’s quite a few options to change, but don’t worry— once we’ve done it for one command, we can easily copy the entire configuration and make a single tweak to give us access to other flask cli commands, including any custom ones you may implement yourself.
For the Script input (A), we want to navigate to the virtual environment
we’re using for our project and within that folder we want to pick the flask
file which will reside in the bin folder, or in the Scripts folder if
you’re on Windows.
The Script Parameter field (B) is set to the cli command you wish to
execute, in this example we use run which will run our development server.
We need to add an environment variable (C) to identify our application.
Click on the browse button and add an entry with FLASK_APP on the
left and the name of the python file, or package on the right
(app.py for example).
Next we need to set the working directory (D) to be the same folder where our application file or package resides.
Finally, untick the PYTHONPATH options (E) and give the configuration a good descriptive name, such as “Run Flask Server” and click Apply.
Now that we have on run configuration which implements flask run from within
PyCharm, we can simply copy that configuration and alter the script argument
to run a different cli command, e.g. flask shell.